If you are new to design, Canva for beginners is the easiest way to start making professional-looking social media posts without hiring a designer or learning complicated software. You can create a clean Instagram post in about 15 minutes, even if you have never designed anything before.
This Canva for Beginners tutorial shows you how to use Canva step-by-step, from choosing the right post size to downloading your final design. We will also cover simple design rules, common mistakes, and ideas for what to post, especially if you run a small business in Indore, Ratlam, or anywhere in India.
What Is Canva and Why Should Beginners Use It?
Canva is an online design tool that works in your browser and on your phone. It gives you ready-made templates, photos, icons, fonts, and a simple drag-and-drop editor, so you do not need any design skills to start.
Here is why Canva for beginners works so well:
- It is easy to learn. You can move, resize, and edit anything by clicking and dragging.
- It has a free plan. You can create and download many designs without paying anything.
- It saves time. Templates give you a ready layout, so you only change the text, colors, and photos.
- It works everywhere. You can start a design on your laptop and finish it on your phone.
If you have ever wondered where to begin, this Canva for beginners guide keeps everything simple and practical. Canva is a great tool for social media posts, stories, e-invites, posters, and presentations. If you want custom designs made for you, you can also explore our social media creatives and e-invites service.
Before You Start: What You Need Ready
A few minutes of preparation will make your first Canva design much better. Keep these things ready:
- Your goal: Do you want to announce an offer, share a tip, or introduce your business?
- Your text: Write the headline and one or two supporting lines before you design.
- Your logo: Use a clear logo with a transparent background if you have one.
- Your brand colors: Pick two or three colors you will use every time.
- Your photos: Use real photos of your work or products whenever possible.
Canva for Beginners: 7 Easy Steps to Make a Professional Post
Step 1: Create a Free Canva Account and Explore the Dashboard
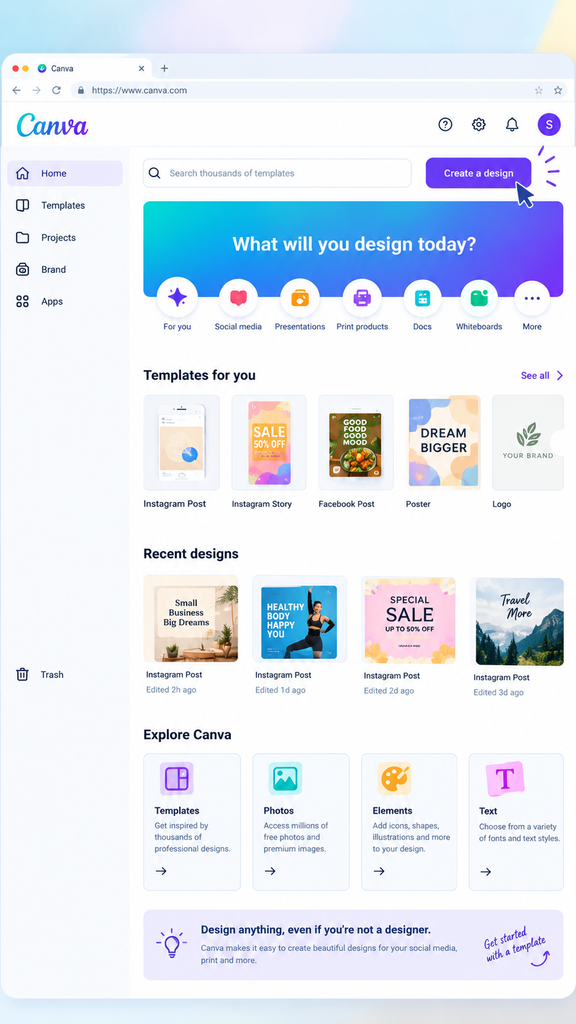
Go to the Canva website or download the app, then sign up with your email or Google account. After you log in, you will see the home screen with a search bar, a “Create a design” button, and many template categories.
Every Canva for Beginners journey starts with exploring. Spend five minutes just looking around. Click on “Templates” and “Projects” to see what is available. This small step makes the rest of the process much easier.
Step 2: Choose the Right Post Size
The first rule of Canva for beginners is to use the correct size. It keeps your design sharp and stops Instagram from cropping it badly. These are the most common sizes:
| Design type | Size (pixels) |
|---|---|
| Instagram square post | 1080 × 1080 |
| Instagram portrait post | 1080 × 1350 |
| Instagram Story or Reel cover | 1080 × 1920 |
For most beginners, the portrait size of 1080 × 1350 is a good choice because it takes up more space on the screen. In Canva, click “Create a design,” search for “Instagram Post,” and Canva will open the right size for you. You can also read Instagram’s official Help Center for the latest feature updates.
Step 3: Pick a Template and Make It Your Own
Templates are the biggest advantage of Canva for beginners. Search with simple words like “bakery offer,” “salon,” “coaching,” or “festival wishes,” and choose a template that matches your business.
When you pick a template, follow these Canva for beginners tips:
- Choose a layout with enough empty space, because crowded designs look messy.
- Avoid templates with too many fonts or effects.
- Always change the colors, fonts, and photos so your post does not look like everyone else’s.
Step 4: Set Your Brand Colors and Fonts
Your posts should look like they come from the same brand every time, and good Canva for beginners habits start right here. This is what makes a small business look professional.
Colors: Choose one main color, one supporting color, and one neutral color such as white or cream. If you are not sure which colors go together, try Canva’s color wheel to find matching shades.
Fonts: Use only two fonts. One bold font for headlines and one simple, easy-to-read font for the supporting text. Using more than two fonts makes your design look confusing.
Once you decide, note down the color codes and font names, and use them in every post. Our digital marketing for beginners guide explains why a consistent brand look helps people trust and remember you.
Step 5: Edit the Text and Build a Clear Layout
Now replace the template text with your own. This is where Canva for beginners gets creative. A good layout has a clear order, so the viewer knows what to read first.
- Headline: The largest text. Keep it short, ideally under eight words.
- Supporting line: One short line that explains the headline.
- Call to action: A small button or line such as “Message us on WhatsApp” or “Book your slot today.”
- Logo: Place it in a corner, small and clean.
Make sure your text is easy to read. Dark text on a light background, or white text on a dark background, works best. You can use the free WebAIM contrast checker to test if your text and background colors are readable.
Step 6: Add Photos, Icons, and Graphics Carefully
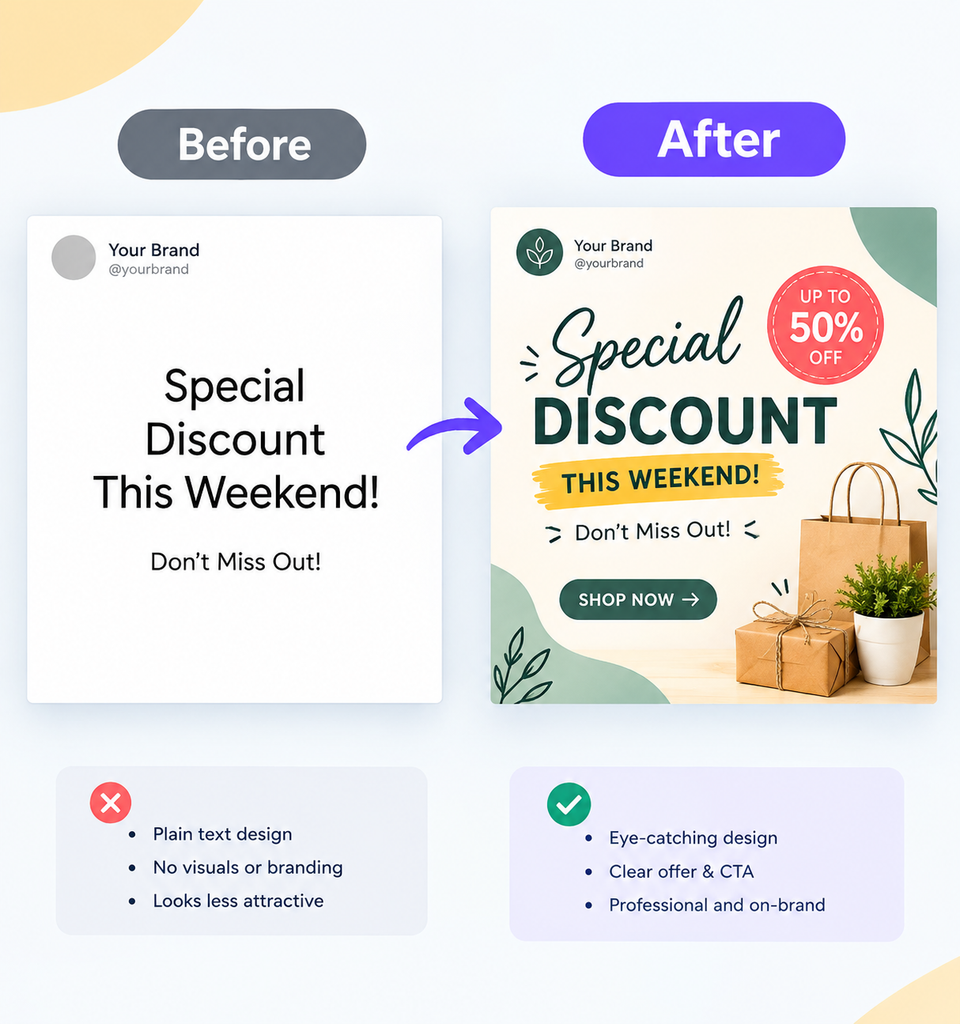
Photos and graphics make your post attractive, but too many can ruin it. Follow these simple rules:
- Use one main image or graphic, not five.
- Pick clear, bright photos. Blurry or dark photos reduce trust.
- Use your own product or work photos when you can. Real photos feel more genuine than stock images.
- Keep icons in the same style, for example, all outline icons or all filled icons.
Canva also offers many free elements, but some are marked with a crown, which means they need a paid plan. Check this before you use one, so you do not get stuck at the download step.
Step 7: Download Your Design and Post It
Click the “Share” button, then “Download.” Choose the file type based on how you will use it:
- PNG: Best for sharp images with text. This is the best option for most posts.
- JPG: A smaller file size, good for photos.
- PDF: Good for printing or for sharing e-invites and menus.
That is the full process of Canva for beginners, from a blank page to a finished post. Before you post, look at your design on your phone, because most people will see it on a small screen. If you can read the headline in two seconds, your design is ready.
Simple Design Rules Every Canva Beginner Should Follow
You do not need to be a designer to follow these basic Canva for beginners rules. They make a big difference in how professional your posts look.
Keep It Simple
One message per post is enough. If you try to say everything in one design, people will scroll past it.
Use White Space.
Empty space is not wasted space. It gives your content room to breathe and helps the viewer focus on what matters.
Align Everything
Keep your text, logo, and images lined up. Canva shows guide lines when elements are aligned, so use them. Neat alignment is the quickest way to look professional.
Stay Consistent
Use the same colors, fonts, and logo placement in every post. Over time, your followers will recognize your posts even before they read your name.
Worked Example: Design an Offer Post for a Local Bakery
Let us put the steps into practice. Imagine you run a small bakery in Indore and want to announce a Diwali sweet box offer. Here is how a Canva for beginners workflow looks in real life.
- Size: Create an Instagram post at 1080 × 1350 pixels.
- Template: Search “Diwali offer” and pick a layout with space for a photo.
- Colors and fonts: Use warm gold and deep maroon, with one bold heading font and one clean body font.
- Headline: “Diwali Sweet Boxes, Now Open for Orders.”
- Supporting line: “Fresh, handmade, and delivered across Indore.”
- Photo: Add a bright photo of your real sweet box instead of a stock image.
- Call to action: “Order on WhatsApp” with your number in a small button.
The whole design takes about 15 minutes. After you download it, post it on Instagram and also use the same photo on your Google Business Profile, so your online presence looks consistent.
How to Use Canva on Your Phone
Most small business owners create content from their phone, and Canva works well there. The Canva for Beginners steps are almost the same on mobile:
- Open the Canva app and tap the plus button to create a new design.
- Choose the Instagram post size and pick a template.
- Tap any text to edit it, and drag the corners to resize elements.
- Tap “Share” and then “Download” to save the design in your gallery.
Use your laptop when you want to do detailed editing, and use your phone for quick changes such as updating a price or a date.
5 Quick Canva Tips to Save Time
- Duplicate your best design. Make a copy and change only the text and photo, so every post stays consistent.
- Use folders. Keep your logos, photos, and finished posts in separate folders so you can find them quickly.
- Plan a week at once. Design five or six posts in one sitting instead of making one every day.
- Save a few master templates. Make one template for offers, one for tips, and one for reviews, then reuse them.
- Check on your phone. Always preview the design on a small screen before you publish.
These small habits make Canva for beginners feel much easier, because you stop starting from zero each time.
Common Canva Mistakes Beginners Make
- Using too many fonts: Stick to two.
- Adding too much text: If your post feels like a paragraph, move the extra text to the caption.
- Choosing hard-to-read colors: Light text on a light background is a common problem.
- Using the wrong size: Always start with the correct post size.
- Copying templates without changes: Many people use the same template, so personalise yours.
- Stretching images: Resize photos by dragging from the corners, not the sides.
- Forgetting a call to action: Tell people what to do next.
Canva Free vs Pro: What Do Beginners Need?
Most people starting with Canva for beginners can do very well with the free plan, so there is no need to pay on day one. It already includes many templates, fonts, photos and the full editor.
A paid plan adds extra features such as a Brand Kit to save your colours, fonts and logos, more premium elements and tools for resizing designs. Start with the free version, learn the basics and upgrade later only if you really need the extra features.
Post Ideas for Small Businesses You Can Make in Canva
Not sure what to design? Here are simple Canva for beginners ideas to start with:
- Offer posts: Discounts, festival offers and new launches.
- Tip posts: A useful tip related to your work.
- Customer reviews: Turn a happy customer’s message into a clean design.
- Before and after: Show the result of your work.
- Behind the scenes: Share how you work or who is on your team.
- Festival wishes: Simple greetings during Diwali, Holi, Raksha Bandhan and other occasions.
Good designs also help beyond Instagram. Clear photos and branding make your Google Business Profile look trustworthy, and strong creatives improve your results when you run ads. If you are planning ads, compare Google Ads vs Meta Ads and design your creatives to match the platform.
How Canva Fits Into Your Bigger Marketing Plan
Canva for beginners is just the first step. Canva helps you create content, but content works best when it is part of a plan. Your posts bring people to your page, your business website explains your services in detail, and local SEO helps nearby customers find you on Google.
If you are still deciding between online and offline promotion, read digital marketing vs traditional marketing. And when you are ready to publish blogs like this one, our guide on what SEO is and how it works will help you write posts that get found.
To keep improving, the Canva Design School offers free tutorials and design tips.
Final Checklist Before You Publish Your Canva Design
Run through this short checklist every time. It takes less than a minute and catches most beginner mistakes.
- Is the size correct for Instagram?
- Can you read the headline in two seconds on your phone?
- Are you using only two fonts and your brand colours?
- Is your logo placed neatly and not too large?
- Is there a clear call to action?
- Have you checked spelling, phone numbers and dates?
If you can answer yes to all six, your post is ready. Following this checklist regularly is the fastest way to improve your Canva for beginners skills.
Frequently Asked Questions About Canva for Beginners
Is Canva free for beginners?
Yes. Canva has a free plan that includes many templates, fonts and photos, which is enough for most people learning Canva for beginners. Some premium elements need a paid plan.
Do I need design skills to use Canva?
No. Templates and the drag-and-drop editor let you create good designs without any design experience, which is why Canva for beginners is so popular.
Can I use Canva on my phone?
Yes. Canva works as a mobile app on Android and iPhone, and your designs sync with your account on the laptop.
What is the best size for an Instagram post?
The portrait size of 1080 × 1350 pixels and the square size of 1080 × 1080 pixels are both commonly used. Pick one and stay consistent.
Can I use Canva designs for my business?
Many Canva designs can be used for business posts, but you should always check Canva’s content license terms for each element, especially for logos and paid content.
How long does it take to learn Canva?
Most beginners can create a simple post in their first session. If you follow this Canva for beginners guide, you can finish your first design in about 15 minutes. With a few days of practice, you will feel much more comfortable.
Conclusion
Learning Canva for beginners does not have to be difficult. Choose the right size, start with a template, use your brand colours and two fonts, keep your layout clean, and always add a clear call to action. Practise a little every week and your posts will quickly look more professional.
If you would rather focus on running your business and leave the design work to someone else, we can help. Creative Nest creates social media creatives, e-invites and branded designs for small businesses. Book a free consultation and let’s make your brand stand out.
Leave a Reply